
You can easily transfer iPhone Back Photo or move photos and videos from iPhone\iPad to your Mac or PC using the Photos app and a USB cable. Additionally, you can use iCloud Photos to share your pictures on any of your devices.
Use The iCloud Photos Program to Transfer your iPhone Back Photo & Videos from iPhone\iPad to your Mac or PC
iCloud Photos assures that your photos and videos are secure, up-to-date, and accessible instantly on all of your Apple products, iCloud.com, and even on Windows computers, you can perform iPhone Back Photo. With iCloud Photos, you don’t have to manually transfer photos from one iCloud device to the other.
Also Read: iPhone 14 CarPlay Not Working including 14 Plus: How to Solve
iCloud Photos automatically backs up and stores all your pictures in their original, super-high-resolution version. You can either keep the full-resolution version on each device or save storage space by going for the device-optimized version.
No matter what, you can always access the original versions of your files. All the changes or modifications you’ve made will be synced up to all of your Apple devices automatically. Before you activate iCloud Photos, make sure you have enough iCloud storage to store your entire collection of photos and videos. It is an essential part to utilize your iCloud storage for this purpose.
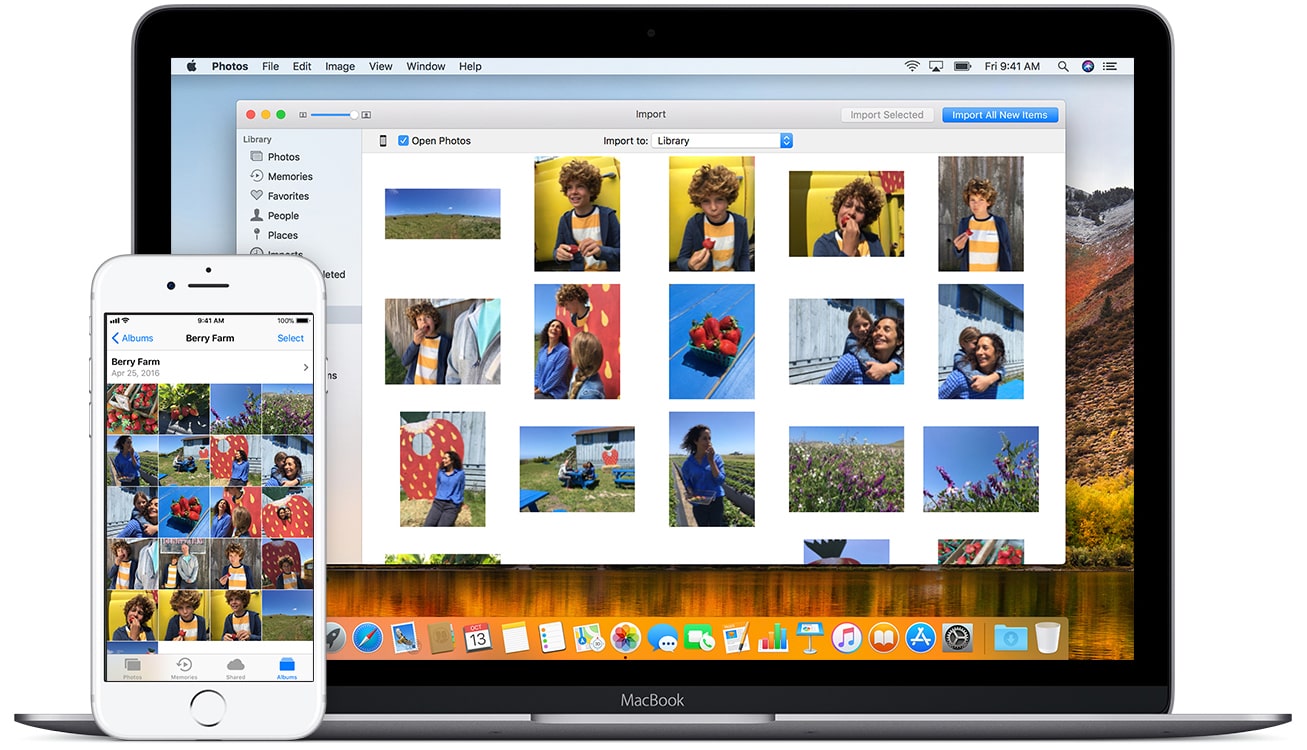
How to Import Photos & Videos to your Mac
If you have iCloud Photos, you don’t need to bother connecting your device to your Mac to import photos and videos–it’s already taken care of! On the other hand, if you wish to manually import them and iPhone Back Photo, simply plug in your device to your Macbook.
Here are the STEPs to Import to your Mac:
STEP 1: Connect your iPhone or iPad to your Mac using a USB cable.
STEP 2: Now navigate to the Photos application on your computer.
STEP 3: When you open the Photos app, you’ll see an Import screen with all the photos and videos from your connected device. If you don’t see the Import screen, just click on the device name in the Photos sidebar.
STEP 4: Unlock your iPhone or iPad using your passcode when requested. Should you be shown a prompt on your device prompting you to Trust This Computer, tap Trust for continuation.
STEP 5: If any prompt appears to enter your passcode, go ahead and unlock your iPhone or iPad. If you see a message that says ‘Trust this Computer‘, tap ‘Trust‘ and you’re all set.
STEP 6: Now select the destination for your photos. Just beside the “Import to” tag, you can either pick an already created album or generate a new one.
STEP 7: Choose which pictures you’d like to bring in and hit the “Import Selected” button, or if you want to grab all the new images, select “Import All New Photos“.
STEP 8: Once the operation is complete, go ahead and unplug your gadget from your Mac.
And if you are reading this blog post, means you are an iPhone Lover so currently iPhone 11 is available at a cheap price which looks still premium from iPhone 11 back side, and if you purchased the previous year’s launch iPhone 13 pro max then this post will help you to transfer iPhone 13 pro max images to your Mac or Windows PC.
Also Read: How To Track an AirPods Case?
Here are the STEPs to Import to your Windows PC:
STEP 1: You can easily transfer photos from your device to your windows computer by plugging it in and opening the Windows Photos app.
STEP 2: Confirm that you have the most recent version of iTunes installed on your computer. To import photos to your computer, you will need iTunes 12.5.1 or a more recent version.
STEP 3: To connect your iPhone or iPad to your PC, you’ll need to use a USB cable.
STEP 4: If required, enter your passcode to get access to your iPad or iPhone.
STEP 5: If you get a prompt on your iOS or iPadOS device requesting you to Trust This Computer, tap Trust or Allow to further process.
Now, visit the Microsoft’s website for guidance on how to transfer photos to the Windows Photos app on Windows PC.
And if your iCloud Photos is enabled so you can easily iPhone Back Photo, but it’s essential to get the original, full-size versions of your photos on your iPhone or iPad before transferring them to your computer.
If you’ve downloaded videos from your iOS or iPadOS device onto your PC, then you may find that they are displayed in the wrong orientation when played on the Windows Photos app. To fix this, transfer them to iTunes for a properly oriented viewing experience.
To optimize the compatibility of photos from your Apple device with Windows, take the following actions to iPhone Back Photo:
- Open up the Settings section on your iPhone or iPad.
- Press the Camera button, then tap Formats.
- Your camera is now optimized to capture images and videos in JPEG and H.264 formats, the highest quality which is available.